SpringBoot学习笔记【二】Druid 监控记录持久化 + 数据库密码加密

上一篇中我们构建了SpringBoot种子项目,整合了Mybatis、Druid、Swagger2,过程中我们发现以下两个问题:

  1. application.yml配置文件中的数据库用户密码是明文的,直接将密码以明文的方式写在配置文件中显然是不合适的

  2. Druid监控平台是基于内存的,重启则会丢失监控数据

关于以上两个问题的配置,Druid的Wiki中已经给出了解决方案,下面我们带着以上两个问题进行学习。

监控记录持久化

Wiki链接:怎么保存Druid的监控记录

Druid监控记录持久需要配置 spring.datasource.druid.timeBetweenLogStatsMillis 属性,这个表示每隔多长时间将监控记录输出到日志文件中,当 timeBetweenLogStatsMillis > 0 时,Druid会自动进行监控记录的日志输出。

这里的日志输出默认是在com.alibaba.druid.pool.DruidDataSourceStatLoggerImpl中实现的,代码如下:

1
2
3
4
5
6
7
8
9
10
11
12
13
14
15
16
17
18
19
20
21
22
23
24
25
26
27
28
29
30
31
32
33
34
35
36
37
38
39
40
41
42
43
44
45
46
47
48
49
50
51
52
53
54
55
56
57
58
59
60
61
62
63
64
65
66
67
68
69
70
71
72
73
74
75
76
77
78
79
80
81
82
83
84
85
86
87
88
89
90
91
92
93
94
95
96
97
98
99
100
101
102
103
104
105
106
107
108
109
110
111
112
113
114
115
116
117
118
119
120
121
122
123
124
125
126
127
128
129
130
131
132
133
134
135
136
137
138
139
140
141
142
143
144
145
146
147
148
149
150
151
152
153
154
155
public class DruidDataSourceStatLoggerImpl extends DruidDataSourceStatLoggerAdapter {

private static Log LOG = LogFactory.getLog(DruidDataSourceStatLoggerImpl.class);

private Log logger = LOG;

public DruidDataSourceStatLoggerImpl(){
this.configFromProperties(System.getProperties());
}

/**
* @since 0.2.21
*/
@Override
public void configFromProperties(Properties properties) {
String property = properties.getProperty("druid.stat.loggerName");
if (property != null && property.length() > 0) {
setLoggerName(property);
}
}

public Log getLogger() {
return logger;
}

@Override
public void setLoggerName(String loggerName) {
logger = LogFactory.getLog(loggerName);
}

@Override
public void setLogger(Log logger) {
if (logger == null) {
throw new IllegalArgumentException("logger can not be null");
}
this.logger = logger;
}

public boolean isLogEnable() {
return logger.isInfoEnabled();
}

public void log(String value) {
logger.info(value);
}

@Override
public void log(DruidDataSourceStatValue statValue) {
if (!isLogEnable()) {
return;
}
Map<String, Object> map = new LinkedHashMap<String, Object>();

map.put("url", statValue.url);
map.put("dbType", statValue.getDbType());
map.put("name", statValue.getName());
map.put("activeCount", statValue.getActiveCount());

if (statValue.getActivePeak() > 0) {
map.put("activePeak", statValue.getActivePeak());
map.put("activePeakTime", statValue.getActivePeakTime());
}
map.put("poolingCount", statValue.getPoolingCount());
if (statValue.getPoolingPeak() > 0) {
map.put("poolingPeak", statValue.getPoolingPeak());
map.put("poolingPeakTime", statValue.getPoolingPeakTime());
}
map.put("connectCount", statValue.getConnectCount());
map.put("closeCount", statValue.getCloseCount());

if (statValue.getWaitThreadCount() > 0) {
map.put("waitThreadCount", statValue.getWaitThreadCount());
}

if (statValue.getNotEmptyWaitCount() > 0) {
map.put("notEmptyWaitCount", statValue.getNotEmptyWaitCount());
}

if (statValue.getNotEmptyWaitMillis() > 0) {
map.put("notEmptyWaitMillis", statValue.getNotEmptyWaitMillis());
}

if (statValue.getLogicConnectErrorCount() > 0) {
map.put("logicConnectErrorCount", statValue.getLogicConnectErrorCount());
}

if (statValue.getPhysicalConnectCount() > 0) {
map.put("physicalConnectCount", statValue.getPhysicalConnectCount());
}

if (statValue.getPhysicalCloseCount() > 0) {
map.put("physicalCloseCount", statValue.getPhysicalCloseCount());
}

if (statValue.getPhysicalConnectErrorCount() > 0) {
map.put("physicalConnectErrorCount", statValue.getPhysicalConnectErrorCount());
}

if (statValue.getExecuteCount() > 0) {
map.put("executeCount", statValue.getExecuteCount());
}

if (statValue.getErrorCount() > 0) {
map.put("errorCount", statValue.getErrorCount());
}

if (statValue.getCommitCount() > 0) {
map.put("commitCount", statValue.getCommitCount());
}

if (statValue.getRollbackCount() > 0) {
map.put("rollbackCount", statValue.getRollbackCount());
}

if (statValue.getPstmtCacheHitCount() > 0) {
map.put("pstmtCacheHitCount", statValue.getPstmtCacheHitCount());
}

if (statValue.getPstmtCacheMissCount() > 0) {
map.put("pstmtCacheMissCount", statValue.getPstmtCacheMissCount());
}

if (statValue.getStartTransactionCount() > 0) {
map.put("startTransactionCount", statValue.getStartTransactionCount());
map.put("transactionHistogram", rtrim(statValue.getTransactionHistogram()));
}

if (statValue.getConnectCount() > 0) {
map.put("connectionHoldTimeHistogram", rtrim(statValue.getConnectionHoldTimeHistogram()));
}

if (statValue.getClobOpenCount() > 0) {
map.put("clobOpenCount", statValue.getClobOpenCount());
}

if (statValue.getBlobOpenCount() > 0) {
map.put("blobOpenCount", statValue.getBlobOpenCount());
}

if (statValue.getSqlSkipCount() > 0) {
map.put("sqlSkipCount", statValue.getSqlSkipCount());
}

// 省略部分代码

if (statValue.getKeepAliveCheckCount() > 0) {
map.put("keepAliveCheckCount", statValue.getKeepAliveCheckCount());
}

String text = JSONUtils.toJSONString(map);

log(text);
}

}

可以看到Druid是以Json形式进行日志输出的,具体的数据处理在log(DruidDataSourceStatValue)方法中进行,这个方法也是后续我们需要用到的。

Druid默认的持久化方式是进行文件记录,如果我们想要自定义监控记录的持久化方式则需要自定义StatLogger,参考以上StatLogger的默认实现,我们可以定义一个简单的StatLogger,如下所示:

1
2
3
4
5
6
7
8
9
10
public class StatLogger extends DruidDataSourceStatLoggerAdapter implements DruidDataSourceStatLogger {
private Logger logger = LoggerFactory.getLogger(StatLogger.class);

@Override
public void log(DruidDataSourceStatValue statValue) {
logger.info("***************************************************");
logger.info(" 监控数据持久化 ");
logger.info("***************************************************");
}
}

在这里,我们重写了log(DruidDataSourceStatValue)方法,一个简单的StatLogger就定制完成了,下面我需要在dataSource中配置这个statLogger,我们在配置文件中druid节点下加上如下配置:

1
2
time-between-log-stats-millis: 60000
stat-logger:

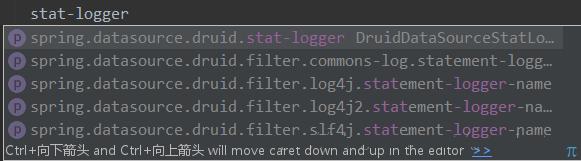
配置过程中发现 stat-logger 对应的是一个DruidDataSourceStatLoggerAdapter对象,而yml配置文件中仅支持基本数据类型和Map、List等类型,查看源码可以发现,在DruidAbstractDataSource类中有如下定义:

1
2
3
4
5
6
7
8
9
10
11
12
13
14
15
16
17
protected long timeBetweenLogStatsMillis;
protected DruidDataSourceStatLogger statLogger = new DruidDataSourceStatLoggerImpl();

public void setStatLoggerClassName(String className) {
Class<?> clazz;
try {
clazz = Class.forName(className);
DruidDataSourceStatLogger statLogger = (DruidDataSourceStatLogger) clazz.newInstance();
this.setStatLogger(statLogger);
} catch (Exception e) {
throw new IllegalArgumentException(className, e);
}
}

public void setStatLogger(DruidDataSourceStatLogger statLogger) {
this.statLogger = statLogger;
}

支持直接设置statLogger对象和通过类名设置两种方式,回到配置文件中发现没有类名的这个配置项,这就比较尴尬了,如下:

既然通过配置文件不能够直接配置,那么我们就以配置类的方式来配置Druid数据源,新建一个Druid的配置类,如下所示:

1
2
3
4
5
6
7
8
9
10
@Configuration
public class DruidConfig {
@Bean
@ConfigurationProperties(prefix = "spring.datasource.druid")
public DataSource druidDataSource() {
DruidDataSource dataSource = new DruidDataSource();
dataSource.setStatLogger(new StatLogger());
return dataSource;
}
}

这里用到了@Configuration和@Bean注解,@Configuration就相当于我们写在xml文件中的,@Bean则是,xml是Spring早期的配置形式,从Spring 3.0开始提出了通过Java类进行配置的形式。

其中@ConfigurationProperties表示配置的属性,这里会将配置文件中以spring.datasource.druid为前缀的值映射到DataSource对象的同名属性上,在这个方法中,我们将DatSource的statLogger设置为我们自定义的StatLogger,下面让我们来看一看效果(将时间间隔设置为了10秒):

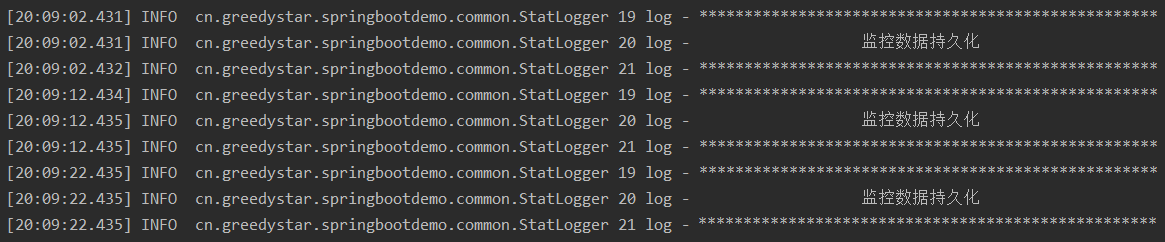
从图中可以看到,每隔10秒会执行一次StatLogger中的log方法。

这样,我们就可以参照Druid的默认实现来进行一系列的数据持久化操作了。

数据库密码加密

参考使用ConfigFilter 2.数据库密码加密,首先对数据库密码进行加密,得到私钥、公钥和加密后的密码,如下:

1
2
3
privateKey:MIIBVQIBADANBgkqhkiG9w0BAQEFAASCAT8wggE7AgEAAkEAjRDnoc5cjZnfeQ2mA7G8xtoTsFFTDSlkws9kDQ974n/pHsKr3sFQIPKCTMvt69R9CY+ms2HooppIpdXR0FWCFwIDAQABAkA0la6i5Hgf2NIzH+FY0zKZtcVNHqOk7l8/N2wGalU18wa1AGwJnPYnsHeTqqxv5AwA9ifqr/72xjmZjQXE9tRRAiEAxorHSILMWJzMwIEjOPA4RE+LfbPYotsfVAszPNR+3K0CIQC14/H89XZtBR2R9+X8kaRwK6Xh8TkSEXLyF2labXyOUwIgB+2YwZt/f3ZbcsB1YJuvE4M9pbpdxzsKyDdeR2qQ2k0CIQCuSePA7jwyLuqsygvYvn4A9fIX1JtJEus/yusquSrW/QIhAID7hqZmohMq/W75Ujkrf/YcQnGDq8e9iVpVFhiinll+
publicKey:MFwwDQYJKoZIhvcNAQEBBQADSwAwSAJBAI0Q56HOXI2Z33kNpgOxvMbaE7BRUw0pZMLPZA0Pe+J/6R7Cq97BUCDygkzL7evUfQmPprNh6KKaSKXV0dBVghcCAwEAAQ==
password:CaYks2C7nfXL0rYtFag29XiCaG//f4A/wPjoMvYQDEeZJo/Vr3ZpFHMdeg75CeFQ5dvplmbSU0rGNn4wNGhJtw==

然后修改application.yml配置文件,来支持数据库密码的加密,如下所示:

1
2
3
password: CaYks2C7nfXL0rYtFag29XiCaG//f4A/wPjoMvYQDEeZJo/Vr3ZpFHMdeg75CeFQ5dvplmbSU0rGNn4wNGhJtw==
filters: stat,wall,log4j2,config
connection-properties: config.decrypt=true;config.decrypt.key=MFwwDQYJKoZIhvcNAQEBBQADSwAwSAJBAI0Q56HOXI2Z33kNpgOxvMbaE7BRUw0pZMLPZA0Pe+J/6R7Cq97BUCDygkzL7evUfQmPprNh6KKaSKXV0dBVghcCAwEAAQ==

其中password为加密后的数据库密码,config.decrypt.key为公钥。

这里需要注意,一定要在filters中加上config的配置,用于通过别名启动插件,如下:

1
filters: stat,wall,log4j2,config

这里表示启动了监控统计、SQL防火墙、日志记录和Config。

Druid的Wiki中指出:有两种配置Filter的方式,一种是配置filters属性,一种是配置proxyFilters属性,这两种配置是组合关系,不是替代关系。

但实际配置过程中发现,如果只配置proxyFilters,如下启动configFilter:

1
spring.datasource.druid.filter.config.enabled=true

实际是无法启动configFilter的,需要在filters中通过Filter别名指定使用的插件。

经过以上的配置,我们就完成了数据库密码加密的配置,更具体的配置可以参照Druid的Wiki进行学习。

源码地址:https://github.com/GreedyStar/spring-boot-demo

最后的最后,安利一下自己写的一个Java代码生成工具,能够方便的生成Spring、SpringMVC、Mybatis架构下的Java代码,希望能对大家有所帮助,地址:Java代码生成器:Generator